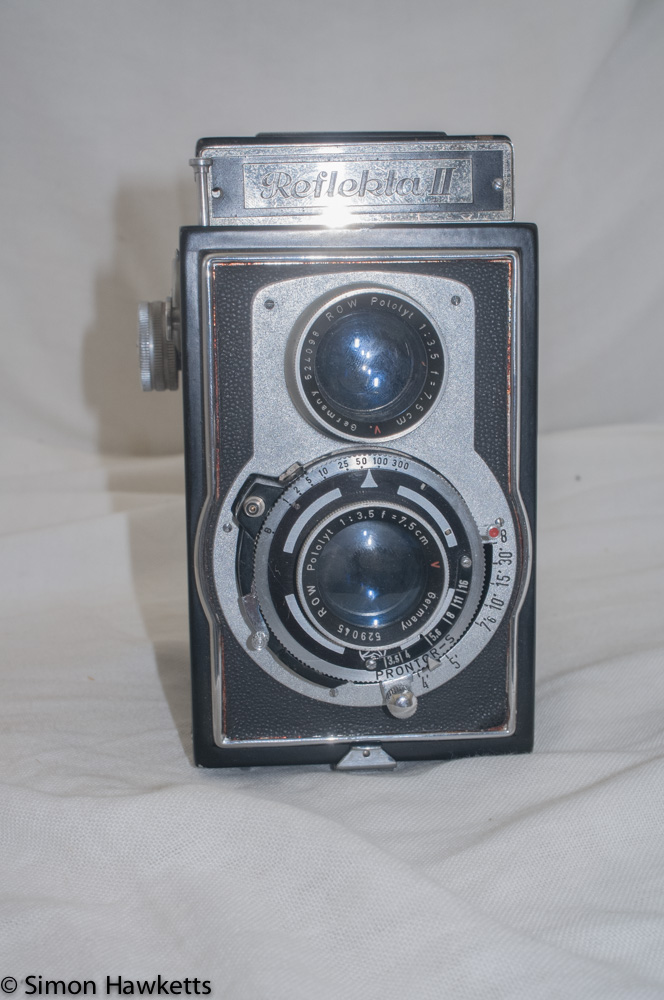
In this post, I'm going to describe the process I used to Service my Reflekta II TLR camera with Prontor S shutter and restore it to working order.
Problems with the Reflekta II TLR
To recap, I'll just go over the problems I had with my Reflekta II which resulted in me needing to service the unit.
First, the focus lever was locked solid and wouldn't move. This is indicative of the focus helicoid being gummed up with old grease, which needs to be cleaned out and replaced.
Secondly, the self-timer was set and wouldn't run down - again an issue with old oil and grease jamming up the mechanism.
Thirdly, the shutter wouldn't actually fire and move the shutter blades. I suspected this to be because the self-timer wasn't moving, but I subsequently found this wasn't the full picture.
Fourthly, the lenses needed cleaning and so did the viewing screen and mirror.
Servicing the Reflekta II TLR camera.
The first part of servicing the Reflekta II TLR camera is to get to the components that need to be serviced and cleaned, so the camera needs to be dismantled. The process I used is described in the next section.
Stripping down the Reflekta II TLR
This gallery shows the steps I took to strip down the Reflekta II TLR to remove the shutter and focus helicoid.


To get the shutter and focus helicoid out of the camera, I first tried to remove the four screws on the inside of the camera which hold the focus assembly to the camera body. Once I'd done that I could feel that the lens assembly was loose, so I then tried to remove the front, decorative panel.
This panel is held on with five small screws and once I'd removed them, and unscrewed the viewing lens, I could remove this panel, although it wasn't easy because in my particular camera the focus was stuck with the lens extended to nearly its furthest extent, so it took quite a bit of jiggling to get the plate past the different levers around the lens. Fortunately, the fact the self-timer was set helped in this case.
With the front decorative panel off, I found I still couldn't remove the lens assembly, so I tried to release the lens by unscrewing the ring at the back of the lens which held it in place, but although I could release the back lens assembly, using a ring spanner, I couldn't get to the ring that held the shutter in place.
I finally released everything by removing the four chrome screws which hold the front of the camera in place, and then the whole front panel came off with the lens assembly attached. I could then get a ring spanner on the back of the shutter and unscrew it.
Cleaning up the focus helicoid.
The focus helicoid of the Reflekta II TLR was, as I suspected, completely frozen with old grease, so the first action was to get it moving, so I could clean it properly. I did this with a few cotton buds and some IPA (Isopropyl Alcohol), dripping the fluid into the helicoid threads to loosen the old grease. After a few applications of IPA, I found the control freed up, and I could at least move it.
The helicoid basically consists of four parts, the lever which adjusts the focus, the fixed part of the helicoid which is attached to the front standard, the moving part of the helicoid and the threaded part that screws to the lever. To service the helicoid basically consists of removing all these parts, cleaning them thoroughly to remove all the old grease, and then re-assembling them with some fresh grease.
The two parts of the helicoid unscrew, and once the two stop screws which act in the slots are removed, it's possible to completely separate them. Then it's just a question of unscrewing the focus lever and cleaning all the parts. I used IPA to clean them all and then put all the parts through an ultrasonic cleaner with a drop of washing up liquid to remove the remains of the grease.
When it comes to re-assembly, the difficult part is making sure that when the two parts of the helicoid are re-threaded back together, the same threads engage as were engaged before they were removed. The way I tried to make sure that happened was by scratching marks on the two parts before they were removed, so I could check they lined up when I re-assembled them. Then, in order to confirm that the settings were correct, I fitted the viewing lens back into the front standard and refitted it to the camera body and confirmed that the viewfinder was focusing correctly.
The small gallery below shows the helicoid during the cleaning, with the final photo showing the completed cleaned and regreased assembly being tested in the camera.


Servicing the Prontor S shutter
The shutter fitted to the Reflekta II TLR is a Prontor S shutter, and after I'd removed it from the camera, an inspection of the aperture blades and the shutter blades showed me that they were coated in a thin layer of oil. This confirmed that the problem with the self-timer would be that it was gummed up with oil and grease, but also that the rest of the shutter was likely to be the same.

To get the shutter apart, I needed to remove the ring that held the front plate on the shutter, but I found it didn't work in the normal way.
I would expect to release the small screw that stops the ring from turning, and then unscrew it, but in this case, although it unscrewed it wouldn't move all the way up to the top of the shutter. It took me a few minutes to realise that the ring was impeded by the actual lens.
What had happened was when I unscrewed the lens from the front of the shutter, instead of the whole lens coming off, only the front of the lens had been removed. Once I realised that, I used a friction tool to unscrew the lens body and then the ring could be removed.
Once the retaining ring was removed, the front plate and speed setting plate can be lifted off to reveal the shutter itself. It was at this point that I found the real problem with the shutter - almost every part was coated with a thin layer of oil that was gumming everything up. I don't know for certain where the oil came from, but I suspect it is the result of the focus helicoid grease solidifying in the focus mechanism and the lighter parts of the grease making their way into the shutter.
Anyway, to get the shutter working I had to strip out the self-timer, the slow speed escapement and then split the shutter to clean up the shutter blades and the aperture blades. The gallery below shows the steps I took to do this, but I'll add text below to cover the process as well.
Reflecta II TLR shutter servicing Pictures


Shutter strip down and cleaning
The first part of the shutter I removed was the self-timer, which is easily recognised because of the arm with the red dot. I found I could lift this out of the shutter after I'd unhooked the spring which supplies the force to move it when set.
With the self-timer removed, I started to remove the components around the cocking lever, starting with the B lever, but then decided to see if the escapement mechanism would also lift out of the shutter. I removed a black screw from the end of the escapement (seen in the picture to the right here), but that didn't release it, and then I found there is another screw which is hidden under the black cog about halfway along the escapement.
I pushed the arm that the cog is on towards the centre of the shutter to remove the screw, and with a bit of jiggling managed to extract the escapement. Both these components (the self-timer and the escapement) I cleaned in lighter fuel, working them in the liquid to remove all the old sticky oil.
To clean up the shutter blades, I needed to separate the two halves of the shutter, which is done by turning it over and removing four screws from the bottom of the case. Just note that one of the screws is much longer than the others, so make sure to note which one that is.
Once the screws are removed, the shutter plate with the cocking lever and blades attached can be pulled out of the bottom part which holds the aperture. In my case, the blades didn't all come out, one of them remained stuck to the top of the aperture plate, and I had to soak it with lighter fluid to get it free.
All the blades were a sticky, oily mess and had to be carefully cleaned with lighter fluid using cotton buds to remove it. You need to be very, very careful when doing this. A slight slip with a cotton bud on the edge, and you can bend the blade, and once bent it will never work because it's impossible to get the bend out.
Once the blades were cleaned, I also thoroughly cleaned the plate they sit on, and also cleaned the rest of the components fitted to the shutter. This is the cocking arm, the flash sync arm and the shutter release components, and I cleaned them by flushing the whole assembly with lighter fluid.
Once that was done, I assembled the shutter blades back on the shutter, so it was ready to be fitted back into the shutter case.
The next job was the aperture blades.
I had hoped to be able to flush these with light fluid and not have to take the aperture assembly apart, but even after two or three attempts there was still oil showing on the surface of the blades, so I needed to remove the two screws that held the top plate on and remove the blades for cleaning.
With the plate removed I could release all the aperture blades, which again had a thin layer of oil covering them, and clean them in the same way I had cleaned the shutter blades.
Assembling the blades on the shutter is a tricky job which involves a lot of patience, but it's a joyful holiday compared to the aperture blades.
As you can see from the picture here, they have to be assembled in a ring and the top plate fitted over the top, making sure the pins in the aperture blades fit in the holes in the plate.
It's hard enough getting the blades in a ring because, although it starts off easy enough, after the first 5 or 6, you have to start fitting them under blades you've already positioned. You need to do this with tweezers because you can't touch the blades, or you contaminate them with grease from your fingers.
Once they are in a ring, you need to fit the plate over the top without moving the blades and get all the pins to protrude through the holes.
I managed to do this, but it took about an hour and I had to hold the plate over the top and try moving the blade pins with the pointed end of tweezers whilst I slightly rocked the plate to gather all the blades into the correct place.
Many times I thought I had everything in place only to find as I moved the aperture control that the blades didn't all move and the aperture wasn't round. At this point you have to stop moving the blades immediately and try again, because if you force the blades, again they can bend and become useless.
Eventually I had the plate fitted and re-fitted the two screws that holds the aperture assembly together.
With the aperture cleaned, I had to re-assemble the two parts of the shutter. This involves taking the shutter with the shutter blades assembled and fitting it into the bottom half of the shutter, but it has to be done upside down, so the shutter blades don't fall off. I used the flash contact as the reference point, lining it up with the flash contact on the shutter. This again is a tricky operation, but it only took about 3 attempts to get it in place and re-fit the screws in the bottom.
With those two tricky operation complete, the rest of the shutter service should have been simple because it's just a question of re-assembling all the cleaned bits.

However, I found that once I'd got everything back in place, the shutter still wouldn't reliably fire. The cocking arm would not snap back when the release was fired, and I deduced that there was still oil under the cocking lever post and flash sync - so I removed them to clean the oil up.
Although this was the correct thing to do, it led to more problems because the post the cocking lever sits on has the main spring for the shutter which needs to sit against a spacing washer and once it's been released it is a real pain to get back into the correct position.
I did manage to get the main spring re-fitted, but I had to completely strip the shutter down again to do it, splitting the back half from the front and removing all the shutter blades. However, other than more work, once I cleaned out all the oil from under the cocking lever and got the shutter re-assembled, it does work with one annoying issue.
For some reason, speeds slower than 1/25 don't work. When they are selected, the shutter opens, but won't close. This is something I am still investigating, but at the moment I've reassembled the shutter in the hope that I can fix it from the top side (which I can do by just removing the face place and speed ring).
Reflekta II TLR Shutter release, lens, mirror and focus screen servicing
The shutter release on the Reflekta II TLR is fitted to the top of the camera and operates on a steel plate which moves and presses the shutter release pin. All I did to this part was clean up all the old dirt and grease before applying a very small amount of new grease.
The focusing screen is released by removing all the obvious screws around it and pulling it out of the top of the camera. I cleaned the screen with clean water, and I also used clean water on a cotton bud to take the worst of the dirt off the mirror. I suspect the mirror is front silvered, so it won't take much cleaning, so it's better to have a dirty mirror than no mirror.
The lens units I cleaned with normal lens cleaner, and I found once I'd done that there wasn't any trace of fungus on the lens anyway.


The rest of the re-assembly was just a case of reversing what I'd done to take the camera apart, and once I'd done that I had a mostly functioning Reflekta II TLR again.
This post is part of a series: The Reflekta II TLR Camera