There is a phrase I often hear - "This is where the magic happens". It's often used when we have a visitor to the office and I think - "it's only software". Well, the process of printing your own pictures really does feel like magic is taking place right in front of your eyes.
The chemical process of printing your own pictures in black & white is basically the same as for developing the film. There is a developing bath, a wash and a fixing bath. The big difference is that you can see it all happening. Because the printing paper is insensitive to red light it's possible to have a dull red light running while you carry out the process and see the picture appear on the paper. We used to have a Patterson Darkroom light, which was a 15 watt bulb encased in a red all over shade which we used to tie up above the kitchen window. Then I would try to cover the window with blankets to block out any remaining light and set to work.
Once the room was darkened I was ready to go. The chemicals were held in shallow dishes about 12 inches by 9 inches. I had them arranged in a line with a box of photographic paper, then the enlarger followed by the developer tray, a tray with water for a quick wash, the fixer tray and then the sink for washing.
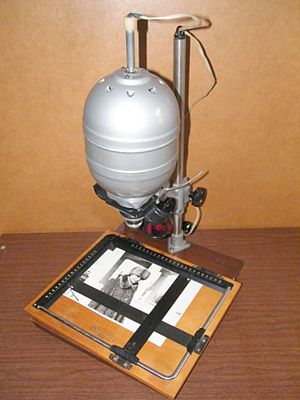
The enlarger is basically a projector which takes the negative and projects it downwards onto the printing paper. I would normally have gone through the negatives and tried to select the ones I thought were the best so I'd load a negative into the enlarger and switch it on, projecting the image first on to the enlargers base plate. After the image had been focused you could get a reasonable idea of the picture you were about to produce.
The stages of printing your own pictures with the enlarger were not dissimilar to what I now do using Lightroom. First the image is cropped - in Lightroom I drag the image around a virtual frame and drag the frame to new sizes. In the darkroom I could zoom in and out of the image by raising and lowering the enlarger head, remembering to adjust the focus at the same time. This produced a bigger or smaller image which I could then fit the printing paper into.
In Lightroom the next step would be to adjust the exposure if required. Well in the darkroom you had to work out what exposure the photographic paper needed. Photographic printing paper is much slower than file and normally takes exposures of several seconds. To accurately work out the exposure time you needed to produce a 'test strip'. A test strip is produced by cutting a strip about an inch wide off a sheet of photographic paper and laying it on the enlarger base with the enlarger off. Then you place a piece of normal paper over all but an inch of the test strip and expose this for say 2 seconds. Then you move the normal paper down an inch and expose for another 2 seconds. You repeat this until you have exposed the whole test strip in a series of 1 inch strips. You then put the test strip through the development process, making sure you leave it in the developer for the amount of time recommended on the developer instructions.
Once it's developed you will have a section of the picture exposed for varying amounts of time and you can see what the correct exposure should be. Armed with this knowledge you then proceed to expose a full piece of photographic paper to produce your print.
But hold it ... You need to make some decisions first. Do you want a glossy print or a matt print ? What size border do you want ? Is this going to be a high contrast image of a low contrast image ? All these things need to be decided before you go any further because for some of them the choice of paper influences the type of print you produce. In fact, you should choose the correct type of paper before you make your test strip.
Once the paper has been chosen it was mounted on the enlarger base and you turn on the enlarger for the correct amount of time. Then the paper is picked up and placed in the developer. I used to put the paper in with the exposed side down and then turn it over, so that all the photosensitive side got wet at the same time. Then, with the paper turned the right way up you could watch it to see the image appear, keeping any eye on the clock or timer to make sure the paper stayed in the developer for the correct amount of time.
I still remember the thrill I felt as the picture appeared. I really was magical to see.
Once the picture was developed, the print had a quick wash and then went into the fixer for a few minutes. After the picture had been fixed for a few minutes the light could go on and you could have a proper look at the results. I remember sometimes feeling a bit deflated at this point, because the pictures often looked a bit washed out compared to the way they looked under red light.
So there it is - pictures produced and time to clear away.
Having seen both analogue and digital photography I certainly think that digital is cleaner, quicker, more technically correct, easier to do etc. but I sometimes wouldn't mind having a go at printing my own pictures again. So much so that I have done a quick eBay search for an enlarger.
